Tech Bulletin 2 ― New Cables: Understanding Issues and Tips for Longevity

Wireline cables are most susceptible to damage during their first few runs into and out of a wellbore when the cable is essentially “new.” Although this seems contrary to what you would expect, the exposure to the wellbore environment helps “season” a new cable and prepares it for life into and out of a wellbore. These first several runs are critical to ensuring you get the maximum trouble-free operation from your cable.

As delivered by the manufacturer, a new cable undergoes essential changes when it is put into service initially. These changes are tension, temperature, and rotation.

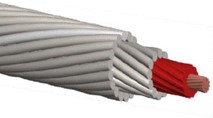
Cable tensions and wellbore temperature during field operations are much higher than during manufacture. These repeated higher tensions at elevated temperatures produce an embedment of the inner armor into the conductor insulation and a reduction of the diameter of a new cable in the range of 0.005 inches. Quality Cables uses a series of pressure rollers to partially embed the inner armor into the plastic core before applying the outer armor during manufacturing. This process reduces the diameter changes typical of a new cable, which starts the seasoning process before running in a well. In the picture below, the insulation depicted in red shows the indentation made during the manufacturing of Quality’s cables.
All cables used in oilfield service have an armor design that develops a torque proportional to the load on the cable. The torque of the outer armor wires is always greater than the opposing torque of the inner armor wires because there are generally more armor wires on the outer, and the distance from the center is greater (increasing leverage). Under load, the outer armor dominating will attempt to rotate and unwind the cable until there is a torque balance between the armor layers.

A cable is subject to only a few hundred pounds of tension during manufacturing, so there is essentially no torque in a new cable as delivered. When installed on a truck, the spooling tensions are significantly higher than during manufacturing, and because the cable is not free to rotate, the cable will develop significant torque. When making the first field operations, this new cable will try to rotate to equalize this built-up torque and support the weight of the tool string. To illustrate the magnitude of this problem, consider a new 5/16-inch cable deployed in a straight 20,000-foot well. The total rotations a new cable end would need to rotate to equalize the torque could be over 400.

Quality Cables decreases the problems associated with cable rotation by including a special blocking material that increases the friction between the inner and outer armor, reducing cable rotation. The armor slowly loses this initial blocking material after repeated operations. With standard cables using galvanized steel armor wires, these spaces between armor wires now become filled with zinc and iron corrosion by-products. When combined with the roughening of the wire from corrosion, these by-products increase the friction between the inner and outer armor, thereby reducing cable rotation.

Cables built for operations in H2S and extreme corrosive well conditions use special alloy armor wires. Alloy wires do not pit or generate corrosion by-products. Without this friction from corrosion, alloy cables rotate freely throughout their life after the initial blocking material is lost.

Operations using alloy cables are frequently in wells containing toxic well gases, where hydraulic pack-offs are generally kept much tighter than in regular operations. These conditions result in additional cable unwinding and loosening of the outer armor. Alloy cables must have the armor tightened and set with post forming throughout their life. There are no standard rules for servicing alloy cables, but bringing a new alloy cable to a service center after the first job and afterward, from every 10 to 20 runs, is good practice.

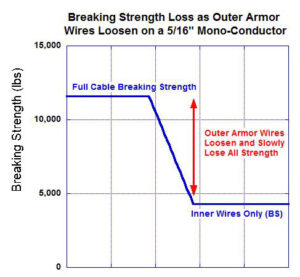
All cables that become loose, particularly new cables, are more susceptible to damage, including: 1) drum crush, 2) outer armor wires being “milked” into a “bird cage,” and 3) a reduced breaking strength.

Notably, the breaking strength of a normalized cable comes from all of the inner and outer armor wires combined. When a cable becomes loose, the load shifts from all the wires to only the internal wires, dramatically reducing the breaking strength, as shown in the graph below.

Tips to Help Prevent Damage to New Cables and Increase Cable Life

  • To allow a new cable to rotate and become “normalized,” it is important to choose the first operations carefully. Select operations with minimum mechanical drag downhole, where little or no pack-off pressure is required and where the hole is relatively straight. In practice, boreholes are never straight, and the end of the cable is never entirely free to rotate, so it takes a new cable several trips in the hole to spin out and become totally “normalized.” Follow the same rules any time a new part of the cable comes off the drum for the first several times.
  • When coming out of the hole, cable tension increases due to friction and the weight of the tool string. This higher tension will cause the cable to rotate and the outer armor to unwind. Line speed is critical; the faster you run in the hole, the less tension the cable experiences. Coming out of the hole at high speeds creates increased tension and captures the cable loosely. Tension reduces when going back into the hole, and the cable rotates to tighten the outer armor. A good operating rule to allow a cable to wind and unwind is typically:
    • While going in the hole, do not allow the tension at any depth to fall below 2/3 of the static tension at that depth.
    • Come out at a speed not greater than the speed that increases the tension by more than 1 1/3 of static tension at that depth.
  • When special operating conditions do not allow for normal cable speeds or tight pack-offs are needed, the cable will unwind and develop loose outer armor. Correcting this condition will require the cable to be taken to a cable service shop to have the armor tightened and post-formed; otherwise, you could jeopardize the cable’s ultimate breaking strength.
  • For new cables, when running in, stop every 1000 to 2000 feet (or whenever the customer permits) to allow the cable to regain tension and properly spin out. At this point, pull back 50 to 100 feet before running further into the well.
  • Avoid deviated wells if possible until the cable is seasoned.
  • Avoid pressure with a hydraulic pack-off and ensure the flow tubes are a minimum of 0.004 inch to 0.006 inch clearance.

Tech Bulletin 1 ― Drum Crush History and Prevention Tips

A historical review and tips on the installation of wireline cable and what to look for to prevent drum crush and other field-related problems:

In the early 1950s, the first double-armored cables had rubber-insulated conductors installed directly from the factory shipping reel to the truck drum. It was common practice to wedge a 2×4 under the flange of the shipping reel to establish some extra tension. Major service companies developed a “dead man” setup where the turn-around sheave was attached to a 500-pound weight. You had to adjust the brakes of the payoff continuously to keep the weight off the ground. Later, it increased to 1000 pounds.

When logging the first “very” deep wells (18,000-20,000 feet) in West Texas, several electrical failures in US Steel cables were labeled factory defects. They discovered that all the failures had occurred at a point in the cable that had not been off the drum. In fact, the shorts were several layers down from any point on the cable that had been in the hole. It was the birth of what is now called “drum crush.” A test solution was to initially spool a new cable back and forth between two trucks, building up the spooling tension 500 pounds at a time until establishing a tension equal to the tension in the field. This test worked and unveiled the first understanding of “drum crush.”

In the late 1950s, with a better understanding of “drum crush,” workers employed different solutions to reduce spooling tension at the well site, which included using a powered capstan or sheave wheel. Later, truck drums improved to take the higher tensions, and capstans were installed in the major spooling shops to install cable at the required higher spooling tensions.

The single-break system was the standard for spooling a cable on a drum years ago. With this method, the cable made the first wrap tight against the flange. As this first wrap was complete, the cable had to bend severely to step over a full cable diameter for the next wrap. This single-break pattern became the standard for many years, and some still use it as it is easier to install. This tight bend can lead to electrical failures when encountering high spooling tensions. Today’s preferred spooling pattern is the double-break pattern, where the cable moves over half a cable diameter each half revolution of the drum. This pattern requires a less severe bend in the cable to move over just half the cable diameter at a time.

You can establish a double-break pattern when the cable makes the first half wrap against the flange, and then a filler of half cable diameter is placed against the drum flange to move the cable over for the last half wrap. It also requires a filler for the last half revolution of the final wrap on the drum. For the entire cable to spool properly, the breaks must form a straight line across the drum, and the cable must move from the bed layer to the second layer at a point precisely opposite the entry point of the cable on the starting flange.

When placing a covering layer back over a lower layer, the covering layer wraps fall in the grooves between the lower layer wraps. The diameter of the spooled cable fitting in the grooves increases the spooled diameter by only 0.87 of a cable diameter. Theoretically, the spooled diameter increases by a full cable diameter at the crossover point. In practice, the cable gets “smashed” at the crossover, so the diameter is not a full cable diameter.

On the second and subsequent layers, the breaks fall on top of the breaks of the underlying layer, causing a diameter build-up. If this diameter build-up is just at one point, as with the single break, the drum full of cable is dynamically out of balance. A drum spooled with a single break in deep hole operations will severely shake the truck at high line speeds. Double-break spooling avoids this problem.

Tips to Help Prevent Drum Crush:

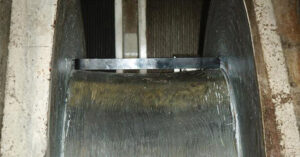
  • Place a straight edge across the drum core, as shown in the picture below. There should be no visible gaps, indicating dips in core diameter. These dips may cause the cable to drop into the valley and lead to gaps in the spool job, causing changes in tension and, ultimately, field problems that may cause drum crush.

  • Measure and record the distance between drum flanges at the core and the top of the flanges. These distances should be at most 1/10 of the cable diameter. After installing the cable, if this distance has increased by more than half a cable diameter, it would indicate that spooling problems may occur in the field. The extra space between the flanges creates gaps in the cable. The cable may squeeze into these gaps under load, leading to drum crush.
  • Check the condition and location of the cable entrance hole on the drum flange. This hole must be touching the drum core. The hole should allow a smooth cable entrance of the cable onto the drum to start the first wrap properly. A kink may result if the cable is not correctly laying next to the flange as the second layer covers it. The cable could short out at this location when adding more and more layers under higher and higher tensions.
  • Establish the double break pattern.
  • When establishing bed layers during cable installation, it is important to ensure that you do not stop while spooling the high-tension layers because the cable tension will fall off, resulting in a “soft” section in the cable that could lead to drum crush. If a stop occurs, it is good practice to return to the bed layers and start over.
  • When running into the well, it is vital to prevent the loss of tension on the cable because the breaking point backs up, the spool job loosens, and the cable becomes “soft.” A cable under tension or “hard” can withstand much higher axial loading. If you pull tension across this “soft” section, the cable can crush itself, which may not occur immediately but could happen several jobs later. Once tension is lost, the maximum tension that can be applied safely is twice the measured tension when the tension was lost. To prevent damage, you must take the cable to a service center to re-establish the proper tension profile.
  • Periodically, have the cables tightened at a qualified service center to ensure that the cables remain normalized (i.e., the outer and inner armors are torque balanced).
Forum Quality Wireline & Cable Greaseless Enviro-Lite E-Line Cables

Practices to Avoid: Greaseless Enviro-Lite E-Line® Cables

Learn practices to AVOID when it comes to Conventional Wireline Cables

Just as we encourage all customers operating conventional cable to follow our recommended best practices, our team of experts have developed a list of the most notable practices we ask customers to AVOID.

  • DO NOT: Tension cycle the line if stuck; this includes surging the well.
  • DO NOT: Pull more than 4,000 lbs. of surface line tension on the cable. If you are required to operate outside of normal RIH/POOH operations, stop and CALL prior to proceeding.
  • DO NOT: Operate the cable in hostile or corrosive environments; this includes H2S or acid.
  • DO NOT: Float tools while RIH; maintain TVD cable weight in fluid while RIH and pumping down.
  • DO NOT: Keep feeding line into the well once pumps are shut down. Around 200’ from your target depth, start reducing the line speed to increase line tension; this will prevent low tension transfer across the drum.
  • DO NOT: Apply more than 1,000 psi on the upper/lower rubber hand pumps over minimal rubber actuation.
  • DO NOT: Continue to run bad rubbers. If excessive pressure is required to maintain the seal, then SOMETHING is wrong – STOP… LAY DOWN the cable and investigate.
  • DO NOT: Use any aerosol spray, solvents or WD40 on the cable.
Forum Quality Wireline & Cable
Forum Quality Wireline & Cable Conventional Cables

Best Practices: Conventional Cables

Learn Best Practices for Conventional Wireline Cables

Our team of wireline experts encourage all customers operating conventional cable to follow our recommended best practices.

  • Ensure the drum’s integrity prior to any installation.
  • Always use a Certified Service Center for installation.
  • Season the cable for first 30 runs.
  • Allow the cable to rotate on the vertical zone of the cable for at least five minutes every 1,000 – 2,000 feet.
  • For new cables, stick to the 80/120 tension rule after the cable is seasoned 50/150.
    • The tension going into the well should never be less than 80% of line weight plus tool weight.
    • The tension coming out of the well should never exceed 120% of the line weight, tool weight, and any drag from the well due to friction that would increase tensions.
  • Use 0.004” to 0.006” clearance flow tubes.
  • Periodically, check cable for:
    • Kinks or shiny spots in cable and mark or note location.
    • Loose armor or torque on the cable.
  • Check the cable electrically pre-job and post-job.
  • Inspect the rope socket components for excessive wear or scaring of cone and washer.
  • Have the cable serviced if you experience any abnormal high tensions or any great loss of tension while on job.
  • Ideally, the unit should be at least 25 feet from the bottom sheave for every 12” of width on your cable drum.
  • Use the proper sheaves size for each cable.
  • When re-heading, check cable for embrittlement.
  • Inspect for cross armor wires while re-heading through flow tubes.
  • When possible, use swivels to help achieve the proper rotation.
  • Bring cable to a service center for retorquing after 80 to 100 runs.
  • Keep an accurate logbook and note all things that you see. This will help the service centers and manufacturer better service your cable for longer life and to resolve any potential cable issues.
Forum Quality Wireline & Cable
Forum Quality Wireline & Cable Greaseless Enviro-Lite E-Line Cables

Best Practices: Greaseless Enviro-Lite E-Line® Cables

Learn Best Practices for Greaseless Enviro-Lite E-Line® Cables

Our team of wireline experts encourage all customers operating greaseless cable to follow our recommended best practices.

  • Stop operations if there seems to be something out of the norm. Make a quick phone call and verify before continuing operations.
  • Keep the line pre-lubed with mineral oil while RIH and POOH. Applying a light spray to each wrap will suffice. During the last run on the pad, spray a light coat to each wrap to help keep the line moisturized between jobs.
  • Maintain lubrication in the lube chamber of the control head; fill when off the well between runs to make sure the cavity is full.
  • At a minimum, there will need to be TVD line weight in fluid maintained while RIH and pumping down to prevent compression of the cable.
  • A minimal element/rubber pressure needs to be maintained to maximize rubber and line life.
  • Follow ALL break-in procedures for a new line being introduced into any operation.
  • The tool weight in air for ALL operations should be no less than 800 lbs.
  • Make note of any cable abnormalities in the line record book, including the measured depth and length of the damaged area.
  • NO more than 60 runs should be ran on ANY re-head.
  • Control heads should be pressure washed and fully rebuilt prior starting a pad.
Forum Quality Wireline & Cable Greaseless Enviro-Lite E-Line Cables